Wednesday, July 15, 2015

Phaser Isometric Alternative

After my first experience with a Phaser game using the Isometric plugin, I was troubled. I like isometric-style games, but this particular game wasn't really benefiting a whole lot from the isometric view. The performance issues on mobile and the bug with the tree boundaries also bothered me. I was wondering if I could create the same kind of game without using any plugins.

So of course I tried it.

And it actually worked pretty well.

First of all, I updated my game template. In Monday's example, I created the methods for the game scene with object prototypes but I have since learned that to be unnecessary. In my new format, I pass an object into the Phaser.Game method that specifies preload, create, update, and render functions.

Here is basically the same frog soccer game, but without the Isometric plugin.

var width = 800;
var height = 600;

var init = function () {

    var game = new Phaser.Game(width, height, Phaser.AUTO, 'test', {
        preload: preload,
        create: create,
        update: update,
        render: render
    });

    function preload() {

        game.load.image('tree2', 'images/tree2.png');
        game.load.image('ball', 'images/ball.png');
        game.load.image('frog', 'images/frog.png');

    }

    var frog;
    var tree;
    var ball;
    var group;
    var cursors;

    function create() {

        group = game.add.group();

        game.stage.backgroundColor = "0x409d5a";

        frog = group.create(200, 200, 'frog');
        game.physics.enable(frog, Phaser.Physics.ARCADE);
        frog.body.drag.set(300);
        frog.body.setSize(60, 25, 0, 42);
        frog.body.collideWorldBounds = true;

        tree = group.create(100, 300, 'tree2');
        game.physics.enable(tree, Phaser.Physics.ARCADE);
        tree.body.setSize(79, 25, 0, 98);
        tree.body.immovable = true;
  
        ball = group.create(300, 300, 'ball');
        game.physics.enable(ball, Phaser.Physics.ARCADE);
        ball.body.bounce.set(1);
        ball.body.drag.set(20);
        ball.body.setSize(45, 35, 0, 8);
        ball.body.collideWorldBounds = true;
        
        group.sort();

        cursors = game.input.keyboard.createCursorKeys(); 

    }

    function update() {

        if (cursors.left.isDown) {
            frog.body.velocity.x = -150;
        } else if (cursors.right.isDown) {
            frog.body.velocity.x = 150;
        } else if (cursors.up.isDown) {
            frog.body.velocity.y = -150;
        } else if (cursors.down.isDown) {
            frog.body.velocity.y = 150;
        }

        group.sort('bottom', Phaser.Group.SORT_ASCENDING);
        game.physics.arcade.collide(group);

    }

    function render() {

        //game.debug.body(frog); // un-comment to see the boxes
        //game.debug.body(ball);
        //game.debug.body(tree);

    }

};

window.onload = init;

As I mentioned, the new game constructor format is on lines 6 through 11. The functions that implement the parts of the scene appear below it.

On line 13 is the preload function. This function is very simple, as it just loads the three sprite images and assigns them reasonably named keys.

Lines 21 to 25 declare some variables that need to be referenced in both the create and update functions.

The create function, on lines 27 through 55, is very similar to the one from the isometric version of the game. There are minor differences in how the group and sprites are created. On lines 33, 39, and 44, I create sprites directly in the group object by calling group.create and passing in the coordinates and the image key.

The calls to .body.setSize that appear on lines 36, 41, and 48 reduce the size of the physics collision areas of the sprites to boxes that approximate their footprint if they existed in 3 dimensions instead of 2. This is very important to make the game appear like it did in the isometric version. With the collision boxes confined to the lower portions of the sprite images, it can appear as though the frog can walk behind the tree but not through the tree. The following image, with the bounding box debug turned on, illustrates the issue.


What ensures that as the sprites move around they get ordered in such a way as to continue this illusion of the third dimension? The magic is on line 82, in the update function. The call to group.sort re-orders the z-value for all the sprites so that the correct ones are on top. It takes two parameters - the first is the field on the sprite that will be used to order the sprites and the second is the sort order. As you can see, I specify the field bottom as the value on which to sort. As soon as the bottom of a sprite goes lower than another sprite, it moves to the front. This successfully recreates the same effect I was getting using the Isometric plugin.

The rest of the update function, on lines 57 - 72, just handles setting the frog's velocity based on the cursor keys and doing the collision check.

The render function can be left blank, or optionally turn on collision box visualization.

My second attempt at this Phaser game has turned out better, in my opinion. I think I am going to move forward with this one instead of my first attempt. I left out the grass tiles today but I intend to add them back in, as well as add appropriate animation and directional images for the frog. I should have more progress to report on Friday!

Soon, you'll be able to play this game where you control a frog hopping through a world that looks just like the comic.

Amphibian.com comic for 15 July 2015

Monday, July 13, 2015

Starting out with Phaser and the Isometric Plug-in

I mentioned last week how I am finally starting to work on my 404-page game for Amphibian.com. And while I'm doing this I will be learning a new HTML5 game framework, Phaser.

Phaser is a very popular choice for creating modern games for the web browser. It supports both "regular" Canvas and WebGL, and also has mobile optimization as one of its core principles. I thought it would be a good thing to learn. I want to train now for the GitHub Game Off 2016 (assuming there will be one!).

Phaser is a modular framework that supports third-party plugin modules, and while browsing through the Phaser tutorials and documentation I came across the Isometric plugin. It claims to allow easy creation of isometric 3D-style games projected onto the 2D Phaser canvas. The demos looked good, and I've always loved the isometric style so I thought I'd give it a try.

Today, I will document my experiences so far.

First of all, I want to express some general reservations about using Phaser on mobile or desktop. The JavaScript file is enormous - even minified it comes in at 692 KB! Forget about serving the full-size version at 2.63 MB. But I put those reservations aside and gave it a try anyway.

I found the Phaser documentation to be very long-winded. I tend to learn best by just jumping in to a working example and playing around with it, but it was difficult to locate anything both basic and useful at the same time. Eventually I came upon this boilerplate template for starting a new Phaser game using the Isometric plugin. First is the basic HTML page:

<!DOCTYPE html>
<html>
<head>

    <meta charset="utf-8" />
    <meta name="viewport" content="width=device-width, initial-scale=1.0, maximum-scale=1.0">

    <title>Froggy 404</title>

    <link rel="stylesheet" type="text/css" href="css/style.css"/>

    <script src="js/phaser.min.js"></script>
    <script src="js/phaser-plugin-isometric.js"></script>
    <script src="js/game.js"></script>
    
</head>
<body>
  
</body>
</html>

And then the JavaScript code for the game.js file:

var width = window.innerWidth;
var height = window.innerHeight;

var init = function () {

    var game = new Phaser.Game(width, height, Phaser.AUTO, 'test', null, false, true);

    var BasicGame = function (game) { };

    BasicGame.Boot = function (game) { };

    BasicGame.Boot.prototype =
    {
        preload : function() {

            // load game resouces here
            game.load.image('id1', 'path/to/image1.png');
            game.load.image('id2', 'path/to/image2.png');

            // add and configure plugins...

            // set world size, turn off physics, etc.

        },

        create : function() {

            // setup game elements here.
            // create sprites, controls, camera, etc.

        },

        update : function() {

            // handle movement stuff...

            // check for collisions, etc.

        },

        render : function() {

            // special render handling

        }

    };

    game.state.add('Boot', BasicGame.Boot);
    game.state.start('Boot');
 
};

window.onload = init;

The key parts here are that as soon as the page is loaded, you can create the game as seen on line 6. Since by default Phaser will create the Canvas element for you (note that the HTML page is pretty much empty) it needs to know the dimensions. Using window.innerWidth and window.innerHeight will create a full-window game experience. Lines 8, 10, and 12 are setting up a BasicGame class and giving it a function called Boot. This function will handle a game state, and in this simple game there will be only one state. The prototype for the Boot function contains four basic methods: preload, create, update, and render. Those are where you put the actual game code. Lines 49 and 50 set the Boot class to a game state and then start that state.

One other thing to note is that I am NOT using the minified version of the Isometric plugin. Why not? Because I get a JavaScript error using the minified version of the latest release! Booo! Anyway, moving on...

Now to write some actual game code. What do I want my game to do? A lot of stuff, but I have to start small. To demo, I am going to make an area with a tree, a soccer ball, and a frog. The player can move the frog around with the arrow keys and kick the ball. Sounds easy, right?

First, the preload function needs fleshed-out. Using the Phaser game object, I can load the images I'll need for the sprites, set up the Isometric plugin, and start the Isometric physics system. I put the following code in the preload function:

game.load.image('tree2', 'images/tree2.png');
game.load.image('ball', 'images/ball.png');
game.load.image('tile', 'images/ground_tile.png');
game.load.image('frog','images/frog.png');
       
// Add the Isometric plug-in to Phaser
game.plugins.add(new Phaser.Plugin.Isometric(game));

// Set the world size
game.world.setBounds(0, 0, 2048, 1024);

// Start the physical system
game.physics.startSystem(Phaser.Plugin.Isometric.ISOARCADE);

// set the middle of the world in the middle of the screen
game.iso.anchor.setTo(0.5, 0);

Isometric ground tile
Loading images is fairly straightforward. The first parameter is the key to use later when making sprites and the second parameter is the path to the image. I have tree, ball, frog, and ground tile images. After that, it's just a matter of adding the plugin, setting the physics system, and setting up the world size.

Load the page and you won't see anything on the screen yet. The next thing to do is to create the game elements, which happens in the appropriately-named create function. There's a little more to this function. Here is the code I used:

// set the Background color of our game
game.stage.backgroundColor = "0x409d5a";

// create groups for different sprites
floorGroup = game.add.group();
obstacleGroup = game.add.group();

// create the floor tiles
var floorTile;
for (var xt = 1024; xt > 0; xt -= 35) {
    for (var yt = 1024; yt > 0; yt -= 35) {
        floorTile = game.add.isoSprite(xt, yt, 0, 'tile', 0, floorGroup);
        floorTile.anchor.set(0.5);
    }
}

var tree1 = game.add.isoSprite(500, 500, 0, 'tree2', 0, obstacleGroup);
tree1.anchor.set(0.5);
game.physics.isoArcade.enable(tree1);
tree1.body.collideWorldBounds = true;
tree1.body.immovable = true;

var ball = game.add.isoSprite(600, 600, 0, 'ball', 0, obstacleGroup);
ball.anchor.set(0.5);
game.physics.isoArcade.enable(ball);
ball.body.collideWorldBounds = true;
ball.body.bounce.set(0.8, 0.8, 0);
ball.body.drag.set(50, 50, 0);
        
// Set up our controls.
this.cursors = game.input.keyboard.createCursorKeys();

this.game.input.keyboard.addKeyCapture([
    Phaser.Keyboard.LEFT,
    Phaser.Keyboard.RIGHT,
    Phaser.Keyboard.UP,
    Phaser.Keyboard.DOWN
]);

// Creste the player
player = game.add.isoSprite(350, 280, 0, 'frog', 0, obstacleGroup);
player.anchor.set(0.5);

// enable physics on the player
game.physics.isoArcade.enable(player);
player.body.collideWorldBounds = true;

game.camera.follow(player);

The first line sets the game's background color. This is what you see covering the whole Canvas element when there is nothing else drawn there. I use a kind of green color, slightly different from my ground tile so you can see the difference.

Next, I create groups for the different sprites. Grouping them makes it easier to manage different types of objects. The ground tiles do a lot less than the tree and ball, for example. And speaking of the ground tiles, that's the first thing I add. In a pair of loops, I just cover the entire world area with them. The more interesting parts are next. I create a tree sprite by calling game.add.isoSprite and give it the x, y, and z coordinates along with the id of the image, frame index (always 0 because I don't have any animation yet) and the group for this object. For both the tree and ball objects, I enable the isoArcade physics and enable colliding with the world bounds. I don't want the ball being kicked out of the world! The ball as two additional settings, bounce and drag. They are exactly what they sound like - telling the physics engine that the ball should bounce a certain amount when hitting another object and that it should have decreased friction to roll around on the grass.

Setting up player controls is relatively simple as well. Phaser has built-in support for capturing the cursor keys and using them as game input. This just sets up the capture, using them will be in the update function.

Finally, the create function makes the player sprite and sets up its physics much like the tree and ball. The camera is set to follow the player on the last line. This will keep the frog in view as you move around the field.

If you view the game now in your web browser, you should actually see something! But you can't move yet, because we still have to do the update function!
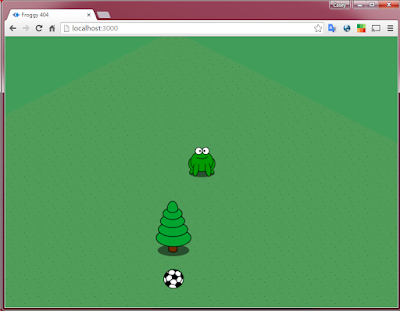
A Frog Soccer Game? Maybe...
The contents of the update function are very simple. Just check for a cursor key pressed and change the velocity of the player. The Phaser engine takes care of the rest!

// Move the player
var speed = 100;

if (this.cursors.up.isDown) {
    player.body.velocity.y = -speed*2;
    player.body.velocity.x = -speed*2;
}
else if (this.cursors.down.isDown) {
    player.body.velocity.y = speed*2;
    player.body.velocity.x = speed*2;
}
else {
    player.body.velocity.y = 0;
    player.body.velocity.x = 0;
}

if (this.cursors.left.isDown) {
    player.body.velocity.x = -speed;
    player.body.velocity.y = speed;
}
else if (this.cursors.right.isDown) {
    player.body.velocity.x = speed;
    player.body.velocity.y = -speed;
}

game.physics.isoArcade.collide(obstacleGroup);
game.iso.topologicalSort(obstacleGroup);

One weird thing here is that I set both x and y velocity for each cursor direction. This is a personal preference and side-effect of the Isometric plugin. In the Isometric view, moving on the X-axis alone moves the player both up/down and left/right but at a 45-degree angle. Same thing for Y-axis movement, but the slope is reversed. It makes sense when you think about it, but I prefer the player motion to match the cardinal direction of the keys. To correct for this, I set both the x and y velocities in each case. The only other things that happen in this function are the collision checks and topological sprite sort at the bottom. These are things that the Isometric plugin takes care of for you - you just have to call them.

One note on that topological sort, however. There are some bugs in it. See this issue on GitHub: custom isoBounds proportions #11. I encountered this myself when I used my other tree image due to its larger dimensions. The topological sort for a 2D projection of 3D space in HTML5 Canvas is a difficult thing to get correct. I know because I had to implement it myself once for a JavaScript game. I'm going to try to figure out what's wrong here and fix it...I really want to use that other tree!

So the only function I haven't touched yet is render. In most cases you can leave it empty, but if you want to do something special with the rendering of the scenes there are some options. This code, for example, will draw some bounding boxes around your sprites for debugging purposes:

obstacleGroup.forEach(function (tile) {
    game.debug.body(tile, 'rgba(189, 221, 235, 0.6)', false);
});


That's what I have so far. The frog can move around the play area and kick the ball. Collisions with the tree, ball, and world edges seem correct. It plays ok on my desktop but the frame rate is not all that good on my phone. I think it might be the Isometric plugin that really slows it down, because most of the Phaser demos performed quite well on mobile. I can't really say if I'm totally sold on Phaser yet...I might have to try making something without the Isometric plugin to see if I really like it.

I need to work on animations next, and look into that topological sort bug some more. I don't have this up anywhere to play yet publicly, but that should come soon. In the mean time, take this code and set up your own game!

And don't forget today's comic!

Amphibian.com comic for 13 July 2015

Friday, July 10, 2015

No, I Don't Want Your Help (but I will later)

The tadpoles that have been in the comic this week have actually been hanging around for quite a while. They actually pre-date the entire comic. I created the tadpole image back in November 2013 as part of my first entry in the GitHub Game Off.

I did write a post about that game back in December 2013, but it wasn't nearly as detailed as my posts concerning my entry in this year's Game Off. When I was thinking about the game, I was reminded of one of my unfortunate personality traits: I have to do everything the hard way the first time.

You can look at the source code for the 2013 game just like you can for the 2015 one. One thing you might notice if you look closely is that I used no HTML5 or JavaScript game development library back then. It's not because I didn't know of any. It's because I really need to figure out how to do it myself before I can use a library to do it for me.

"That doesn't sound so bad," you might say to yourself. But for a game competition it probably put me at a disadvantage. I could have spent more time making the game play better instead of fixing bugs with the keyboard inputs. There are more lines of code in the 2013 game despite it being much more basic. Why am I like this???

The positive side of it is that I learn a lot about what things are easy to do and what things are difficult. This usually helps me when I decide to use a library or utility the second time around. For example, when I did the Game Off 2015 using the Crafty JavaScript game engine I was able to immediately recognize why its API was structured in a certain way because I had structured my own engine the same way through many iterations of improvement. It was an excellent abstraction they used for the different "phases" of the game and I liked it. I also understood why they didn't use time-based movement of sprites but instead opted for per-frame movement calculation.

It's not just online games. I stubbornly kept implementing my own CSS manipulation functions for years before I finally decided to start using jQuery (well, I actually used Dojo first but eventually switched).

I think it really just does come down to my stubbornness. I like to do things for myself. Even when that wastes time. I need to work on this.

You can still play the 2013 tadpole game. Even though it's 100% hand-crafted, it wasn't such a terrible game. It didn't win, though.

The Frog Lifecycle Game
As an aside, once I start using a utility/engine/library/whatever I don't necessarily stick with it as stubbornly as I stick with my own code in the beginning. I am actually experimenting with Phaser now for HTML5 games. Not that Crafty was bad, but Phaser has more of what I'm looking for right now. Remember when I said I was going to make a 404-page game? Yeah, I'll be talking about that soon...

So check out the tadpoles in today's comic. This might be the last time they appear for a while. I'm not sure where that train goes.

Amphibian.com comic for 10 July 2015

Wednesday, July 8, 2015

Async Made Easy

Asynchronous Code Doesn't Have to be Complicated
One of the best things about functional programming with Node is how simple it can be to perform lots of potentially slow functions asynchronously.

That's also one of the worst things.

It's very easy to write really bad code or code that doesn't act the way you expect if you lose sight of the asynchronicity of it all. Fortunately, there are great utility packages like async that make it simple to write good code that acts properly.

Take the following example. Let's say I have a web service that performs some function to its input and returns a new value. For test purposes, let's use the following Node+Express web application that has a single route which reverses a given string.

var express = require("express");
var app = express();

function reverse(s) {
    var o = "";
    for (var i = s.length - 1; i >= 0; i--) {
        o += s[i];
    }
    return o;
}

app.get("/reverse/:s", function(req, res, next) {

    res.setHeader("Content-Type", "text/plain");
    res.send(reverse(req.params.s));

});

// ------------ start listening
var server = app.listen(3000, function() {
    console.log("listening on port %d", server.address().port);
});

Now if I have another application that wants to call that reversal web service with 1000 strings and wait for them all to complete before moving on, what should I do? Making HTTP calls is an asynchronous operation. I make the call and then supply a callback function to let me know when it finishes. Here's the code that sets up the test: a function that makes the web service call and invokes a callback when complete, and an array of 1000 random test strings.

var http = require('http');

function makeString() {
    var text = "";
    var possible = "ABCDEFGHIJKLMNOPQRSTUVWXYZabcdefghijklmnopqrstuvwxyz0123456789";
    for( var i=0; i < 25; i++ ) {
        text += possible.charAt(Math.floor(Math.random() * possible.length));
    }
    return text;
}

function reverseIt(str, callback) {

    return http.get({
        host: 'localhost',
        port: 3000,
        path: '/reverse/' + str
    }, function(response) {
        var body = '';
        response.on('data', function(d) {
            body += d;
        });
        response.on('end', function() {
            callback(body);
        });
    });

}

var testStrings = [];
for (var i = 0; i < 1000; i++) {
    testStrings.push(makeString());
}

First look at what is probably the most commonly used - and incorrect - way of making all the web service calls.

// ----- incorrect - no idea when they are all done

for (var j = 0; j < testStrings.length; j++) {

    reverseIt(testStrings[j], function(r) {
        console.log("got: " + r);
    });

}

console.log("finished!");

The problem is that you have no idea when all the calls complete. The console.log("finished!") is output almost immediately after you start the program, and the individual logs of the backwards strings keep coming out. Don't do this.

The thing that people do after realizing that first method fails is to use the callback from the completed web service invocation to call the web service again, and again, and again until all the strings are processed. Something like this:

// ----- does everything in series.
//       really slow, but you know when it's finished.

function rev(idx, callback) {
    reverseIt(testStrings[idx], function(r) {
        console.log("got: " + r);
        if (idx === testStrings.length - 1) {
            callback();
        } else {
            rev(idx+1, callback);
        }
    });
}

console.time("type2");
rev(0, function() {
    console.log("did them all!");
    console.timeEnd("type2");
});

Defining a wrapper function that makes the call to reverseIt and then calls itself in reverseIt's callback does allow you to know when all 1000 calls have completed. But doing one request at a time invalidates all the performance gains made possible by the asynchronous nature of the http calls. The console.time and console.timeEnd functions will be used as proof of how this is the worst of the "correct" methods. In my local tests, the complete set of 1000 string reversals took on average around 675 milliseconds.

What is the better way? We can still make all the web service calls asynchronously if we set up some way of tracking their completion. Something like this:

// ----- better

function revManager(arr, callback) {

    var counter = 0;
    return {
        go: function() {
            for (var i = 0; i < arr.length; i++) {
                reverseIt(arr[i], function(r) {
                    console.log("got: " + r);
                    counter++;
                    if (counter === arr.length) {
                        callback();
                    }
                });
            }
        }
    };

}

console.time("type3");
revManager(testStrings, function() {
    console.log("all done!");
    console.timeEnd("type3");
}).go();

This method creates a manager for reversing all the strings that will only invoke a callback when all have completed. To keep track of how many have finished, it sets up a closure with a counter variable and returns an object containing a function to start the process - the go function on line 7. It loops over the array of strings and calls reverseIt on each one, much like in the incorrect example above. But in this callback function for reverseIt, the counter variable is incremented and then checked to determine if all have finished. If they have, the manager's callback is invoked. That's the point when we are sure that all 1000 have completed. The timing on this method proves that it completes much faster - my tests averaged 203 milliseconds.

But way back up near the top I mentioned how utility packages like async make this easier. So now that I've done it the hard way, take a look at how async makes it easy with a general-purpose each function:

// ----- easy with async

var async = require('async');

console.time("type4");
async.each(testStrings, function(item, cb) {
    reverseIt(item, function(r) {
        console.log("got: " + r);
        cb();
    });
}, function() {
    console.log("complete!");
    console.timeEnd("type4");
});

Async has a bunch of methods for different patterns, but the each function corresponds to the desired behavior in this example. It takes three parameters. The first is the array of items, and second is what they call the iterator function. This function is called and passed each item as well as a callback. The general contract is that the iterator function should do its thing and then call the callback when complete. The third parameter to each is the callback function for when the entire array has been processed.

The timing indicates that async's each function performs exactly the same as my own function, but is much more generic and allows me to write fewer lines of code. That's a win-win!

Follow my example and use the time you save by writing less code to enjoy today's comic!

Amphibian.com comic for 8 July, 2015

Monday, July 6, 2015

Bridging the Sar-chasm

Percontation? Whaaaat?
Sarcasm is the topic of today's comic. Particularly how the use of sarcasm can be associated with a certain level of intelligence. I remember when my daughter was first able to understand and even use sarcasm around age 8, and I've heard that losing the ability to understand sarcasm is one of the signs of losing your mind.

Sarcasm is quite common in our spoken language, but is difficult to handle in writing. Why can we easily express questions or exclamation in written language but not sarcasm? All are basically just different kinds of vocal inflection when said aloud. How is it that there is no punctuation to represent sarcastic tone?

It has been proposed in the past. As early as the 1580's, writers were using a kind of backwards-looking question mark called a percontation point to represent ironic sarcasm. You've probably never seen a percontation point, because despite having a Unicode definition most fonts deem it so obscure that it is not rendered. And it's not a perfect solution because it would only be applied to irony, and not all sarcasm is ironic. Other proposals over the years have included text with a reverse slant to normal italics, a question mark inside square brackets, and using a tilde at the end of a sentence. Obviously, none of these ever caught on.

So today sarcasm is left to be conveyed using the fake <sarcasm></sarcasm> HTML tags or as a #sarcasm hashtag addendum to a phrase. Why does it have to be this way? Something as basic to the English language as sarcasm should have a first-order representation in our written language! The <sarcasm> tag should have a real rendering in a page, just like bold or underscore or italic.

Since I try to push the limits of both web comics and the English language, I have decided to use the aforementioned tilde to represent the sarcastic statements in my comic. I believe that it is the best choice of all the existing proposals. It exists on a normal keyboard layout and is not a composite of other punctuation, nor does it require any special visual rendering. If everyone starts doing it, we can finally allow sarcasm to take its rightful place in our written language.

Join me, and together we can make the world a more sarcastic place!

Amphibian.com comic for 6 July 2015

Friday, July 3, 2015

Trying out Snap.svg

Snap.svg
On Wednesday I wrote about trying to use the jQuery SVG plugin to perform some simple manipulations to a SVG image directly embedded in an HTML document. While jQuery SVG is perhaps the most popular way to interact with SVG via JavaScript, I found it awkward to use. I decided to give another similar JavaScript package a try - Snap.svg.

Snap.svg is a JavaScript SVG library designed for modern web browsers and created by the author of the Raphaël library. Unlike Raphaël, Snap does not support browsers older than IE 9. This makes it smaller and more feature-rich - and let's face it, there are fewer and fewer reasons every day to support IE 8 and below.

To do a fair comparison between Snap and jQuery SVG, I performed the same task with both libraries. I have a really wide SVG scene with some frogs in it. The viewBox restricts the viewable part of the scene but changes when you click on one of the frogs.

Here is basically the same HTML/SVG I used on Wednesday, with most of the SVG cut out to save space.

<!DOCTYPE html>
<html lang="en">
<head>
    <meta charset="utf-8">
    <title>Snap.svg Test</title>
</head>

<body>

    <div id="svgContainer">

        <svg id="svgScene" xmlns="http://www.w3.org/2000/svg"
                viewbox="0 0 500 282">
            ....
            <g id="ceo-frog">
                ....
            </g>
            <g id="science-frog">
                ....
            </g>
            ....
        </svg>

    </div>

</body>

<script type="text/javascript" src="https://code.jquery.com/jquery-1.11.2.min.js"></script>
<script type="text/javascript" src="snap.svg.js"></script>

</html>

The difference from Wednesday's jQuery SVG page is obviously the script at the bottom. I am including the snap.svg.js file (there's a minified version available too) but unlike the jQuery plugin, Snap does not need any CSS. I therefore don't have any stylesheets included in this one. I am still using jQuery though, but just for the convenience of the function that can be called when the DOM is ready. Snap does not itself rely on jQuery.

Here is the JavaScript that sets up and performs the animation.

$(function() {

    var s = Snap("#svgScene");

    var vb = s.attr("viewBox");
    var bounds = s.getBBox();

    // note that the viewBox object is not the same
    // as the bounds object!

    var ceo = Snap("#ceo-frog");
    var sci = Snap("#science-frog");

    ceo.click(function() {
        s.animate({viewBox: "500 0 500 282"}, 1500, mina.easeinout);
    });

    sci.click(function() {
        s.animate({viewBox: "0 0 500 282"}, 1500, mina.easeinout);
    });

});

On line 3, I get a Snap object that represents the SVG root element. The Snap() function takes as a parameter a selector much like jQuery does for finding the SVG elements on the page.

Lines 5 and 6 (and the comments on 8 and 9) have no bearing on the rest of the code, but I wanted to include them just for informational purposes. The Snap.attr() function is a way to get attribute values for SVG elements. But when calling s.attr("viewBox"), Snap is smart enough to return a special object representing the viewBox, not just its String value. Nice. This is different from calling s.getBBox() however. The .getBBox() function returns an element's bounding box. In the case of my SVG scene that means an object representing the entire width, not just the currently visible portion. Just wanted to point that out. I was impressed.

Continuing on, lines 11 and 12 get the frog objects from the SVG. Notice how you can call Snap() directly to get these - you don't need to pass a reference to the root SVG node or anything. This is quite a departure from jQuery SVG. Once I have those objects, setting up click event handlers follows a pattern much like jQuery event handlers. Lines 14 and 18 are examples of that.

Animation of the viewBox change is also nicer than with jQuery SVG, in my opinion. Snap SVG Element objects (above, s, ceo, and sci are all Elements) have an animate function which is quite similar to jQuery's. To animate a property of the element, you just specify it in an object along with its target value. In my example I am animating the viewBox attribute by specifying the String value I want it to be when the animation finishes. This is done on lines 15 and 19. The second parameter to the animate function is the length of time in milliseconds that the animation should last. Again, this is just like jQuery. The third parameter is optional but specifies the animation's easing function. By default, a jQuery animation easing looks more like the Snap easeinout easing so I specified that to make them match more closely.

Here's what it looks like in action:


What's my conclusion after comparing these two SVG libraries? While the number of lines of code needed to perform the simple click-to-animate-the-viewbox action was basically the same in both versions, I think the Snap API makes more sense. Snap's documentation is also much better than jQuery SVG's. Even so, I wouldn't mind seeing a few more demos linked directly from the documentation (there are some cool demos, but no easy way to view the code behind them), and that viewBox object behavior doesn't even appear to be documented (at least I couldn't find it). After using both to perform the same task, I have to say that I prefer Snap and think I will use it going forward. I would also recommend it if you want to manipulate SVG on a web page. It has a ton more features that I've shown here - this example is extremely basic! Give it a try for yourself.

And enjoy the holiday weekend, if you live in the United States. Enjoy the regular weekend if you live anywhere else in the world.

Amphibian.com comic for 3 July 2015

Wednesday, July 1, 2015

The Basics of jQuery SVG

I know I've been writing more about SVG lately. This is because I am working on a new design for caseyleonard.com that is basically all SVG embedded in an HTML page. But static content is boring! I want a website that moves or something!

One way I can accomplish this is with jQuery SVG, a jQuery plugin that lets you interact with SVGs via JavaScript. I tried to do some basic things with it, just to see if I would like it.

First of all, I will report that the online documentation for jQuery SVG is not the greatest. I found the site navigation to be confusing and explanations of the code samples were hard to understand. There are some good demos, but it's not exactly clear why they work in all cases. I had to do a bit of experimentation in order to figure out the basics.

My goal was to have a very wide scene rendered via SVG. You can only see part of the scene at any given time because of the viewBox settings. Clicking on some elements in the SVG will cause the viewBox to scroll a new part of the scene into view.

Here is a stripped-down version of the HTML page. Most of the SVG has been removed so save space.

<!DOCTYPE html>
<html lang="en">
<head>
<meta charset="utf-8">
<title>jQuery SVG Test</title>
<link rel="stylesheet" type="text/css" href="css/jquery.svg.css">
<link rel="stylesheet" type="text/css" href="css/default.css">
</head>

<body>

    <div id="svgContainer">

        <svg id="svgScene" xmlns="http://www.w3.org/2000/svg"
                viewbox="0 0 500 282">
            ....
            <g id="ceo-frog">
                ....
            </g>
            <g id="science-frog">
                ....
            </g>
            ....
        </svg>

    </div>

</body>

<script type="text/javascript" src="https://code.jquery.com/jquery-1.11.2.min.js"></script>
<script type="text/javascript" src="js/jquery.svg.js"></script>
<script type="text/javascript" src="js/jquery.svgdom.js"></script>
<script type="text/javascript" src="js/jquery.svganim.js"></script>

</html>

At the bottom, you can see the jQuery and jQuery SVG imports. jQuery SVG is very modularized - you need to include the base plus any of the different sub-modules you wish to use. I am using the DOM module to allow me to access the DOM of the SVG much like the DOM of the HTML. I am also using the Animations module to allow me to use jQuery animation with the SVG attributes. Also note that there is a small CSS file included as part of the jQuery SVG package that you'll want to include.

Now it gets weird. Look at the following JavaScript needed to make the viewBox move.

$(function() {

    $("#svgScene").svg();

    var svg = $("#svgScene").svg("get");

    $("#ceo-frog", svg.root()).click(function(e) {
        $("#svgScene").animate({svgViewBox: "500 0 500 282"}, 1500);
    });

    $("#science-frog", svg.root()).click(function(e) {
        $("#svgScene").animate({svgViewBox: "1000 0 500 282"}, 1500);
    });

});

Everything is wrapped in a function that gets called when the page is fully loaded. The first thing that must happen is that the SVG code must be initialized on the SVG element in the document. There on line 5, I used the standard jQuery selector to get the SVG element by id and then call .svg() on it. After that, I can get an SVG object by calling .svg("get") on that same element again.

You need the svg object in order to make calls to find elements inside the SVG. See lines 7 and 11 where I set up click listeners on two of the objects in the SVG scene (a picture of CEO Frog and a picture of Science Frog). The object returned from calling svg.root() must be passed as the second parameter to the normal jQuery selector function in order for it to work properly.

Finally, likes 8 and 12 reveal how to animate the viewBox of the SVG. Using the selector for the SVG root element and a call to the standard jQuery .animate() function, it is possible to create a smooth scroll transition between two viewBox configurations. The most important thing to realize is that you can't use the parameter "viewBox" as input to the animate function. You have to animate the "svgViewBox" attribute instead. I know, there is no actual attribute in the document named svgViewBox. It's just viewBox. But the SVG attributes have special names (mostly the same names with "svg" at the beginning but not always - see the documentation) that you must use for animation purposes. The viewBox attribute is made up of four numbers. The first two are the x and y coordinates for the top left corner of the viewBox. The next number is the width of the view and the last number is the height. In my animation, I change the first number to add 500 each time, which essentially scrolls the view sideways by its width.

I don't know about you, but I find the API for this module to be a bit odd. Yes, I got it to work, but I didn't really feel good about it.

Bottom line: I think I'm going to try Snap.svg next before I make a decision on what to use.

Amphibian.com comic for 1 July 2015