Showing posts with label html5. Show all posts

Friday, January 29, 2016

A Slider Control for the Web

Today's comic has a slider control embedded in the third frame, allowing you to adjust the brightness of the sun and extend daylight. It's suppose to look a bit like the brightness slider control on your phone. I got the idea from my daughter who keeps her brightness on the lowest setting in order to extend the battery life. She also panics when it gets down to 70%, as if a dead phone battery will somehow mean her own death as well. Teenagers...

You might assume that a big fan of HTML5 such as myself would use the range input field to implement the slider. You would be wrong. Unfortunately, I do try to keep the comic mostly compatible with IE9 (that might change be the end of the year) and it does not support the range type of input. Also, the default styling of the range slider looks pretty terrible. It would have taken me a while to get something that looked the way I wanted.

A standard HTML5 slider control. Input type "range" does this.

Well, how about the jQuery Mobile slider? It looks nice, and I already use jQuery. But, alas, its mobile styling really messed up the default styling of all kinds of things on my pages. It would have taken me quite some time to straighten it all out.

The jQuery Mobile Slider control. Looks nice, destroys Amphibian.com.

So twice I was thwarted by wanting a slider that looked nice and didn't cause me to do a lot of extra work. Before I gave up on this idea, I found the Slider for Bootstrap by Kyle J. Kemp. It came with CSS that didn't interfere with the rest of my CSS, and was easy to use.

Start by including the bootstrap-slider.js (or bootstrap-slider.min.js) file on your page. Also include the bootstrap-slider.css (or bootstrap-slider.min.css). Then write some HTML like this:

<input id="brightnessSlider" type="text"
       data-slider-tooltip="hide"
       data-slider-id="bSlider"
       data-slider-min="0"
       data-slider-max="19"
       data-slider-step="1"
       data-slider-value="19"/>

Note that the type of the input is "text" and not "range." Don't worry about that for now, look at the data-slider- attributes. These are used to pass configuration settings to the control. In my case, I wanted to hide the tooltip, set the minimum value to 0, the maximum value to 19 (for 20 total values), the stepping to 1, and start with a value of 19 (the max). The data-slider-id attribute is of interest, though. What it means is that when the JavaScript turns this input into a bunch of other elements that look like a slider, the parent div for all those will be named "bSlider". Once that's created, this text input will be hidden from view. But when the user interacts with the slider, the value will be written back to the text input's value - making it easy to figure out what to use when the form is submitted.

Take a look at the JavaScript now.

var bChange = function() {

    var n = Number($('#brightnessSlider').val());
    console.log("current value is " + n);

};
    
var bslide = $('#brightnessSlider').slider()
                    .on('change', bChange);

In this example, the bChange function doesn't really do much, but it shows how you can get the current value of the slider. The bChange function is passed in as the event handler for the change even when the slider is created.

If you want to change the width of the slider, the only way I found was to alter the CSS width attribute of the control's created div. I did this programmatically when the comic is displayed in one of the small-screen formats. Remember, the control's div will have the id matching the data-slider-id attribute in the input tag.

$("#bSlider").css("width", "150px");

The default width seemed to be 210px, but I reduced that to 150px for the phone screen sizes.

The styled slider in the comic.

After that, I added a few CSS rules to change the colors of parts of the slider, and I ended up with pretty much exactly what I envisioned it should look like. For now, this is the slider control that gets my recommendation - as long as you also use jQuery and Bootstrap. But who doesn't these days?

See the slider in action in today's comic!

Amphibian.com comic for 29 January 2016

Monday, July 13, 2015

Starting out with Phaser and the Isometric Plug-in

I mentioned last week how I am finally starting to work on my 404-page game for Amphibian.com. And while I'm doing this I will be learning a new HTML5 game framework, Phaser.

Phaser is a very popular choice for creating modern games for the web browser. It supports both "regular" Canvas and WebGL, and also has mobile optimization as one of its core principles. I thought it would be a good thing to learn. I want to train now for the GitHub Game Off 2016 (assuming there will be one!).
Phaser is a modular framework that supports third-party plugin modules, and while browsing through the Phaser tutorials and documentation I came across the Isometric plugin. It claims to allow easy creation of isometric 3D-style games projected onto the 2D Phaser canvas. The demos looked good, and I've always loved the isometric style so I thought I'd give it a try.

Today, I will document my experiences so far.

First of all, I want to express some general reservations about using Phaser on mobile or desktop. The JavaScript file is enormous - even minified it comes in at 692 KB! Forget about serving the full-size version at 2.63 MB. But I put those reservations aside and gave it a try anyway.

I found the Phaser documentation to be very long-winded. I tend to learn best by just jumping in to a working example and playing around with it, but it was difficult to locate anything both basic and useful at the same time. Eventually I came upon this boilerplate template for starting a new Phaser game using the Isometric plugin. First is the basic HTML page:

<!DOCTYPE html>
<html>
<head>

    <meta charset="utf-8" />
    <meta name="viewport" content="width=device-width, initial-scale=1.0, maximum-scale=1.0">

    <title>Froggy 404</title>

    <link rel="stylesheet" type="text/css" href="css/style.css"/>

    <script src="js/phaser.min.js"></script>
    <script src="js/phaser-plugin-isometric.js"></script>
    <script src="js/game.js"></script>
    
</head>
<body>
  
</body>
</html>

And then the JavaScript code for the game.js file:

var width = window.innerWidth;
var height = window.innerHeight;

var init = function () {

    var game = new Phaser.Game(width, height, Phaser.AUTO, 'test', null, false, true);

    var BasicGame = function (game) { };

    BasicGame.Boot = function (game) { };

    BasicGame.Boot.prototype =
    {
        preload : function() {

            // load game resouces here
            game.load.image('id1', 'path/to/image1.png');
            game.load.image('id2', 'path/to/image2.png');

            // add and configure plugins...

            // set world size, turn off physics, etc.

        },

        create : function() {

            // setup game elements here.
            // create sprites, controls, camera, etc.

        },

        update : function() {

            // handle movement stuff...

            // check for collisions, etc.

        },

        render : function() {

            // special render handling

        }

    };

    game.state.add('Boot', BasicGame.Boot);
    game.state.start('Boot');
 
};

window.onload = init;

The key parts here are that as soon as the page is loaded, you can create the game as seen on line 6. Since by default Phaser will create the Canvas element for you (note that the HTML page is pretty much empty) it needs to know the dimensions. Using window.innerWidth and window.innerHeight will create a full-window game experience. Lines 8, 10, and 12 are setting up a BasicGame class and giving it a function called Boot. This function will handle a game state, and in this simple game there will be only one state. The prototype for the Boot function contains four basic methods: preload, create, update, and render. Those are where you put the actual game code. Lines 49 and 50 set the Boot class to a game state and then start that state.

One other thing to note is that I am NOT using the minified version of the Isometric plugin. Why not? Because I get a JavaScript error using the minified version of the latest release! Booo! Anyway, moving on...

Now to write some actual game code. What do I want my game to do? A lot of stuff, but I have to start small. To demo, I am going to make an area with a tree, a soccer ball, and a frog. The player can move the frog around with the arrow keys and kick the ball. Sounds easy, right?

First, the preload function needs fleshed-out. Using the Phaser game object, I can load the images I'll need for the sprites, set up the Isometric plugin, and start the Isometric physics system. I put the following code in the preload function:

game.load.image('tree2', 'images/tree2.png');
game.load.image('ball', 'images/ball.png');
game.load.image('tile', 'images/ground_tile.png');
game.load.image('frog','images/frog.png');
       
// Add the Isometric plug-in to Phaser
game.plugins.add(new Phaser.Plugin.Isometric(game));

// Set the world size
game.world.setBounds(0, 0, 2048, 1024);

// Start the physical system
game.physics.startSystem(Phaser.Plugin.Isometric.ISOARCADE);

// set the middle of the world in the middle of the screen
game.iso.anchor.setTo(0.5, 0);

Isometric ground tile
Loading images is fairly straightforward. The first parameter is the key to use later when making sprites and the second parameter is the path to the image. I have tree, ball, frog, and ground tile images. After that, it's just a matter of adding the plugin, setting the physics system, and setting up the world size.

Load the page and you won't see anything on the screen yet. The next thing to do is to create the game elements, which happens in the appropriately-named create function. There's a little more to this function. Here is the code I used:

// set the Background color of our game
game.stage.backgroundColor = "0x409d5a";

// create groups for different sprites
floorGroup = game.add.group();
obstacleGroup = game.add.group();

// create the floor tiles
var floorTile;
for (var xt = 1024; xt > 0; xt -= 35) {
    for (var yt = 1024; yt > 0; yt -= 35) {
        floorTile = game.add.isoSprite(xt, yt, 0, 'tile', 0, floorGroup);
        floorTile.anchor.set(0.5);
    }
}

var tree1 = game.add.isoSprite(500, 500, 0, 'tree2', 0, obstacleGroup);
tree1.anchor.set(0.5);
game.physics.isoArcade.enable(tree1);
tree1.body.collideWorldBounds = true;
tree1.body.immovable = true;

var ball = game.add.isoSprite(600, 600, 0, 'ball', 0, obstacleGroup);
ball.anchor.set(0.5);
game.physics.isoArcade.enable(ball);
ball.body.collideWorldBounds = true;
ball.body.bounce.set(0.8, 0.8, 0);
ball.body.drag.set(50, 50, 0);
        
// Set up our controls.
this.cursors = game.input.keyboard.createCursorKeys();

this.game.input.keyboard.addKeyCapture([
    Phaser.Keyboard.LEFT,
    Phaser.Keyboard.RIGHT,
    Phaser.Keyboard.UP,
    Phaser.Keyboard.DOWN
]);

// Creste the player
player = game.add.isoSprite(350, 280, 0, 'frog', 0, obstacleGroup);
player.anchor.set(0.5);

// enable physics on the player
game.physics.isoArcade.enable(player);
player.body.collideWorldBounds = true;

game.camera.follow(player);

The first line sets the game's background color. This is what you see covering the whole Canvas element when there is nothing else drawn there. I use a kind of green color, slightly different from my ground tile so you can see the difference.

Next, I create groups for the different sprites. Grouping them makes it easier to manage different types of objects. The ground tiles do a lot less than the tree and ball, for example. And speaking of the ground tiles, that's the first thing I add. In a pair of loops, I just cover the entire world area with them. The more interesting parts are next. I create a tree sprite by calling game.add.isoSprite and give it the x, y, and z coordinates along with the id of the image, frame index (always 0 because I don't have any animation yet) and the group for this object. For both the tree and ball objects, I enable the isoArcade physics and enable colliding with the world bounds. I don't want the ball being kicked out of the world! The ball as two additional settings, bounce and drag. They are exactly what they sound like - telling the physics engine that the ball should bounce a certain amount when hitting another object and that it should have decreased friction to roll around on the grass.

Setting up player controls is relatively simple as well. Phaser has built-in support for capturing the cursor keys and using them as game input. This just sets up the capture, using them will be in the update function.

Finally, the create function makes the player sprite and sets up its physics much like the tree and ball. The camera is set to follow the player on the last line. This will keep the frog in view as you move around the field.

If you view the game now in your web browser, you should actually see something! But you can't move yet, because we still have to do the update function!
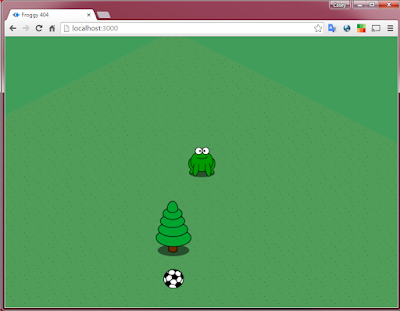
A Frog Soccer Game? Maybe...
The contents of the update function are very simple. Just check for a cursor key pressed and change the velocity of the player. The Phaser engine takes care of the rest!

// Move the player
var speed = 100;

if (this.cursors.up.isDown) {
    player.body.velocity.y = -speed*2;
    player.body.velocity.x = -speed*2;
}
else if (this.cursors.down.isDown) {
    player.body.velocity.y = speed*2;
    player.body.velocity.x = speed*2;
}
else {
    player.body.velocity.y = 0;
    player.body.velocity.x = 0;
}

if (this.cursors.left.isDown) {
    player.body.velocity.x = -speed;
    player.body.velocity.y = speed;
}
else if (this.cursors.right.isDown) {
    player.body.velocity.x = speed;
    player.body.velocity.y = -speed;
}

game.physics.isoArcade.collide(obstacleGroup);
game.iso.topologicalSort(obstacleGroup);

One weird thing here is that I set both x and y velocity for each cursor direction. This is a personal preference and side-effect of the Isometric plugin. In the Isometric view, moving on the X-axis alone moves the player both up/down and left/right but at a 45-degree angle. Same thing for Y-axis movement, but the slope is reversed. It makes sense when you think about it, but I prefer the player motion to match the cardinal direction of the keys. To correct for this, I set both the x and y velocities in each case. The only other things that happen in this function are the collision checks and topological sprite sort at the bottom. These are things that the Isometric plugin takes care of for you - you just have to call them.

One note on that topological sort, however. There are some bugs in it. See this issue on GitHub: custom isoBounds proportions #11. I encountered this myself when I used my other tree image due to its larger dimensions. The topological sort for a 2D projection of 3D space in HTML5 Canvas is a difficult thing to get correct. I know because I had to implement it myself once for a JavaScript game. I'm going to try to figure out what's wrong here and fix it...I really want to use that other tree!

So the only function I haven't touched yet is render. In most cases you can leave it empty, but if you want to do something special with the rendering of the scenes there are some options. This code, for example, will draw some bounding boxes around your sprites for debugging purposes:

obstacleGroup.forEach(function (tile) {
    game.debug.body(tile, 'rgba(189, 221, 235, 0.6)', false);
});


That's what I have so far. The frog can move around the play area and kick the ball. Collisions with the tree, ball, and world edges seem correct. It plays ok on my desktop but the frame rate is not all that good on my phone. I think it might be the Isometric plugin that really slows it down, because most of the Phaser demos performed quite well on mobile. I can't really say if I'm totally sold on Phaser yet...I might have to try making something without the Isometric plugin to see if I really like it.

I need to work on animations next, and look into that topological sort bug some more. I don't have this up anywhere to play yet publicly, but that should come soon. In the mean time, take this code and set up your own game!

And don't forget today's comic!

Amphibian.com comic for 13 July 2015

Monday, June 15, 2015

Using File Drop in Web Pages

Don't Litter - Drop Files in the Right Place!
When I'm making some of the more elaborate comics (such as the fire alarm from Friday or the agile dodgeball game) I like to work out the JavaScript on my test server here on my local network. But sharing the actual comic data (positions of frogs, text bubbles, etc) was always a pain. I would copy and paste JSON from the production server into a SQL statement for my local server or vice-versa. I decided that I should make an "import data" feature directly in the editor.

It is certainly easy enough to put a text area on the screen and let me copy-and-paste in a big JSON string. But while I was doing it, I thought, "Hey, I should just be able to drop a text file in here and have it auto-populate the text area from the file contents."

And so that's what I did.

It's not really that difficult thanks to the File API stuff that's been in JavaScript for a while now. Here is a sample web page that has a single text area on it.

<!doctype html>

<html lang="en">
<head>
  <meta charset="utf-8">
  <title>File Drop</title>
</head>

<body>

  <textarea id="drophere" style="width: 200px; height: 100px;">drop a file here</textarea>

</body>

<script src="https://code.jquery.com/jquery-1.11.2.min.js"></script>

</html>

To allow dropping text files in the text area, the following JavaScript is used.

$(function() {

    $("#drophere").on(
        "dragover",
        function(e) {
            e.preventDefault();
            e.stopPropagation();
        }
    );

    $("#drophere").on(
        "dragenter",
        function(e) {
            e.preventDefault();
            e.stopPropagation();
        }
    );

    $('#drophere').on("drop", function (evt) {

        var e = evt.originalEvent;

        if (e.dataTransfer) {

            if (e.dataTransfer.files.length) {

                evt.preventDefault();
                evt.stopPropagation();

                var file = e.dataTransfer.files[0];

                if (file.type != "text/plain") {
                    console.log("wrong file type");
                } else {

                    var reader = new FileReader();
                    reader.onload = function(fevent) {
                        var txt = fevent.target.result;
                        $('#drophere').val(txt);
                    }
                    reader.readAsText(file);

                }

            }

        }

    });

});

Since I use jQuery, everything is wrapped in a function that will be called as soon as the document is fully ready. Before setting up the actual drop handler, there are two other event handlers that should be registered to prevent undesirable browser behavior.

The first, on line 3, is the ondragover event handler. This event fires constantly when an element is being drug over a drop target. All the event handler does here is prevent the default behaviors of the browser, which in the case of a text area is to move the cursor around where the drop will take place. That isn't needed in my case because I plan on replacing the entire contents of the text area when the drop occurs.

The second event handler (line 11) is for the dragenter event. This event fires once when the element being drug first enters the drop zone. Again, I am just turning off the browser default behavior in here.

The next and final event handler that I register is for the drop event. This is where the good stuff happens. Because jQuery's event object wrapper doesn't really have direct support for the dataTransfer element, the first thing I do here is get the original event object from it. That's the object I will be using for most of the subsequent processing. First I check to make sure that there is a data transfer associated with this event and that the list of files in that transfer is at least one. If those two checks pass, I once again turn off event propagation and the default browser behavior. Remember, the browser will typically load any file you drop on a page as a new document - definitely not what I want to happen!

The next step is to get the file from the list of files in the data transfer and check the type. For my purposes, I only want to accept files that are plain text. It wouldn't make sense to drop an image or something in a text area! Assuming that the file type checks out, I can finally read the contents of the file. On line 36 I create a FileReader and then set the onload event handler. This is the function that will be called with the file data (or possibly an error) once the read is complete. It will be passed an event object, in which the text can be found in the target.result field. Once this function is set up, I just call readAsText and pass in the file (line 41).

Inside the onload function, line 39, is where I set the value of the text area to the contents of the text file. You could just as easily send the file contents directly to the server at this point or do some other processing, This technique will work on other kinds of files as well - instead of reading as text you could read as a binary string or an array buffer or a data URL. See the documentation for more info!

Give my demo a try for yourself and see how convenient it is to drop text file contents in text areas. You'll probably want to add this feature anywhere you have a text area on your own web pages.

And now the obligatory link to today's comic!

Amphibian.com comic for 15 June 2015

Monday, December 15, 2014

Making Some Pies

Shoofly Pie by Syounan Taji
My favorite kind of pie is Shoofly Pie, a molasses pie which originates among the Pennsylvania Germans. It is very similar to the English Treacle Tart, where golden syrup is used instead of molasses, which is also one of my favorite desserts when I'm in the U.K.

None of that has anything to do with the kinds of pies I made last week (before I got sick and spent several days barely awake). I made pie charts. You know, like doughnut charts, but without the hole in the middle. Both sound delicious but can't be eaten.

Also, don't confuse charts and graphs. It is my understanding that a graph is a type of chart that uses lines. Like a square is a type of rectangle.

Anyway, I wanted to take some of my data I capture from amphibian.com and plot it in a way that makes analyzing it easy. I am most interested in how many comics are accessed per day and which types of browsers people use to access the site. I have web services that generate the raw numbers from the server, so I wanted to find a JavaScript client library that could draw pretty pictures for me.

After experimenting with a few options, I went with Chart.js. Another popular recommendation was Data-Driven Documents, D3.js, but that was really overkill for my needs. I like to keep it simple.

Chart.js lets you take JSON data and render 6 different chart types using HTML5 Canvas. You can extend it to create your own additional chart types if you want, but the ones already included meet most needs: Line, Bar, Radar, Polar Area, Pie, and Doughnut. One of its best features is that it allows the charts to be responsive. When enabled, it resizes the canvas element as the parent element changes and the chart still looks good.

Using it on a web page is easy. First, just download the library and include it on your page:

<script type="text/javascript" src="/js/Chart.min.js"></script>

Now put a Canvas element, or elements, on your page where you want to draw the chart(s). There's a tricky thing about Canvases in that they really need width and height attributes, which is fine except when we want to have responsive charts that size with the browser. When going responsive, the trick is to just set the size very small but maintain the proportions, such as 80x60 instead of 800x600 and let Chart.js size it up for you - you won't even notice.

<div style="width: 50%">
  <!-- I really want this chart to fill the div automatically -->
  <canvas id="chart1" width="80" height="60"></canvas>
</div>

All that's left to do is organize your data in an appropriate way for the type of chart you'd like to draw, and pass it to the appropriate Chart function. Let's look at a simple line chart for example, but the Chart.js documentation has plenty of detail on all the other options plus more customizations.

var chartData = {
        "labels": ["A", "B", "C", "D", "E"],
        datasets: [
            {
                label: "Something",
                fillColor: "rgba(151,187,205,0.2)",
                strokeColor: "rgba(0,51,102,1)",
                pointColor: "rgba(151,187,205,1)",
                pointStrokeColor: "#fff",
                pointHighlightFill: "#fff",
                pointHighlightStroke: "rgba(220,220,220,1)",
                data: [33, 57, 42, 88, 101]
            }
        ]
    };

var opts = {
    "scaleGridLineColor": "rgba(0,0,0,.08)",
    "datasetStrokeWidth": 3,
    "responsive": true
};
 
var ctx = document.getElementById("chart1").getContext("2d");
var myChart = new Chart(ctx).Line(chartData, opts);

Line charts need a set of labels for the X-axis, and at least one set of data for drawing a line. You can actually draw more than one line on the same chart, useful when comparing data, which is why the datasets field is an array (even though in my example it only had one element).

Each dataset object should contain a label, color-related information for the lines and fills and points, and the set of values to plot on the Y-axis. Those values should in in an array given as the data field.

An options object can be used as well. There are a number of "global" chart options but each kind of chart has some specific options you can use. I customized the color of the scale grid lines, the stroke width of the data line, and made sure to set responsive to true.

All you need to do is pass the 2D context from the appropriate Canvas element into Chart and pass the the chart data and options to the chart type (see the final 2 lines above). You get back a reference to the chart, which you can use later to update the data and redraw if you want.

A chart that is always 50% of the page width

I was pleased with how simple it was to create and customize the simple charts I needed. I would recommend you check out Chart.js if you have similar needs on a project.

Sorry if you are disappointed by the lack of actual pie making in this blog. I know, I didn't even show how I made a pie chart! I did actually make some, after I made a line chart - but I'll let that be an exercise for the reader (or you could check out the amphibian.com repo on GitHub).

Amphibian.com comic for 15 December 2014

Wednesday, August 13, 2014

Just How Mobile?

I'm sure you're familiar with the Native App vs. HTML5 debate. There's a lot to be said in that one. As a developer, I would much rather make a single HTML5 web app instead of native apps for both iOS and Android.

However, I know that such a course of action would very likely be a bad idea. Don't get me wrong, I love HTML5. But I've seen very few cases where an HTML5 solution is on par with a native app solution. There are some exceptions, and it very much depends on what your particular app is doing.

But HTML5 is getting better. I fully except that someday mobile apps will do things in mobile browsers that are quite impressive. That day is not today.

One place in particular that shows the mobile web's shortcomings is in games. There are many examples of good HTML5 games that are playable on the desktop browsers, but I have trouble finding good ones that play well on mobile browsers. Even very simple games just get awkward on mobile devices.

So if you decide to go native, you'll have to make apps for both iOS and Android. But what if you decide that your particular app is simple enough that you can do it in HTML5? You might want to consider making two web apps, one for desktop and one for mobile. Oh, "that's silly" you say. Everyone knows that you just use responsive design and make one web app.

Or do you?

I read this article, in which the author makes the case that your mobile use cases might be so different from your desktop use cases that it makes more sense to make a second web application just for mobile users. I'm certainly a big fan of understanding your requirements (and use cases) well before developing your software.

Here's the article. Give it a read.

Is responsive design killing mobile?

Think about it.

Amphibian.com comic for August 13, 2014

Friday, August 8, 2014

JavaScript Colors: RGB to HEX

In my web comic editor, I needed to be able to both read and set the background color values on HTML elements. Since I've been working with colors as hex codes since, umm, forever, I thought it would be good to work with the colors that way. But to my dismay, I found that you can set the color of an element using a hex string (e.g. #ff0000), an RGB string (e.g. rgb(255,0,0)), or an HSL string (e.g. hsl(360,100%,50%)) but when you read the value it is always in RGB format. Here's an example:

<!doctype html>

<html lang="en">
<head>
  <meta charset="utf-8">
  <title>Color Test</title>
</head>

<body>

<div id="hextest" style="background-color: #FF0000; width: 100px; height: 100px;"></div>

<div id="rgbtest" style="background-color: rgb(0,255,0); width: 100px; height: 100px;"></div>

<div id="hsltest" style="background-color: hsl(240,100%,50%); width: 100px; height: 100px;"></div>

</body>

<script>

var a = document.getElementById('hextest').style.backgroundColor;
var b = document.getElementById('rgbtest').style.backgroundColor;
var c = document.getElementById('hsltest').style.backgroundColor;

console.log(a);
console.log(b);
console.log(c);

</script>

</html>


Maybe you've had this problem yourself. Fortunately, I found a handy JavaScript function that will convert RGB strings back into hex. It is a very compact and interesting function. Let's take a look at it.

function rgb2hex(rgb) {
 
 function hex(x) {
  return ("0" + parseInt(x).toString(16)).slice(-2);
 }
 var r = rgb.match(/^rgb\((\d+),\s*(\d+),\s*(\d+)\)$/);
 var h = '#' + hex(r[1]) + hex(r[2]) + hex(r[3]);
 return h.toUpperCase();

}

There's a lot of good JavaScript to learn about here. First, you may notice that the function has another function declared inside of it. The inner function, hex, is essentially private to the rgb2hex function the same as a variable definition would be. It's like an anonymous inner function that isn't so anonymous. So what's the hex function doing?

It assumes, first of all, that you give it a String representation of an integer. Like "35" or something. The parseInt() function turns that into a JavaScript Number so that you can call toString(16) on it. What does that do, you ask? The parameter "16" is the radix. Without going into too much detail about what a radix is, just know that using radix 2 will give you the number's value in binary, radix 8 will give you the number's value in octal, and radix 16 gives you the number's value in hexadecimal. So calling toString(16) on a Number object with value 28 will give you the String "1c". But what's up with the fact that "0" is prepended to that value and then the whole thing is sliced with a slice parameter of -2? That's just a simple way of making sure that the return value of the function is always 2 characters and is left-padded with zeros. If the input to the function is less than 16, then the toString(16) call will return a String that is only 1 character long. But if the input is greater than 15, the result will be at least 2 characters. So if we always put a "0" in front and then just return the last two characters of the String, it will ensure that the hex value is 0-padded. Using slice() with a negative value as the parameter is a trick that returns the characters from the end of the String instead of the beginning. For example, "whatnot".slice(-3) returns "not".

Wow, that's quite a lot going on in that one line of JavaScript. The rest of the rgb2hex function isn't quite so tricky. Line 6 just uses a regular expression to find the 3 numbers in the RGB string. For example, with an input String of "rgb(100,200,150)" the value for r will be an array containing the values "100", "200", and "150". Line 7 just uses those three values as parameters to the hex function and sticks the "#" on the front. The last line returns the complete value in all upper case, since I like #FFFFFF better than #ffffff.

Anyway, I hope this function is as helpful to you as it was to me.

Amphibian.com comic for August 8, 2014


Friday, August 1, 2014

Web Comic Launch

Today I launch my web comic, which I have so creatively titled Amphibian.com. I've wanted to do a new comic for years, but I was waiting for the right inspiration. Unless you live in central Pennsylvania (inside this area) you probably don't know that 20 years ago I published a comic about a frog in a local newspaper. But newspapers are dead. Print comics are dead. My comic was barely alive in the first place. What's changed?

Web Comics Made with 100% Real Web


If you've ever read a comic on your computer or mobile device, you may have noticed that most of them are pretty much just print comics converted to a JPG or PNG and stuck on a web page. Most are probably made by talented artists, working with some artisty tools, maybe on a computer but maybe still on paper. Anyone who's ever seen my work knows that I am not a talented artist. But I am pretty good with the technologies that make web sites. And I have been drawing a frog so for so long that it looks like an almost legitimate frog.

So I decided to make a web comic that was made with real web technologies. I designed it to be optimized for mobile devices, and easy to share with your friends. Here's a breakdown of what it's made of.

  • HTML + CSS: The comics are just HTML markup and CSS styling. I didn't draw a box and then draw some stuff in it, I style a <div> to have a border and then position individual <img> objects in it to arrange the scene. Even the speech balloons are just <p> tags with appropriate styles applied.
  • SVG: I take responsive design to a whole other level. When you look at the comics on your phone, not only is the page header and navigation being restyled to fit the smaller screen, the comic images themselves are scaled down as well. Have a retina display? Make the page as big as you want, my frogs won't get all pixelated on you. And with Gzip compression, most of the images are actually smaller downloads than a large PNG would be.
  • JavaScript: In both the client and server, I'm using JavaScript to make things better. In your browser, jQuery lets me animate parts of the comic scenes easily. I can make things change when you click (or touch) the characters in the cells. These can be part of the jokes or just for silly fun. The back-end is made with Node and the Express framework. The part that you don't see is an editor that combines client-side goodness with REST web services to enable me to take the ideas from my head and put them in the comics with ease.
Comic Editor

Why Would Someone Do This?


Are there advantages to this approach to a web comic? I think there are many.

First of all, using web technologies to make web comics really uses the medium to its fullest. Web sites don't just look like newspaper pages (at least not anymore) so why should comics? We have all these great features in our web browsers and we are barely using them. I want to use them just a little bit more.

Second, comics made this way are mobile-friendly. They read top-to-bottom and don't require you to pinch or swipe or poke or jab or jump or anything. If you've ever tried to read a "normal" comic on a mobile phone in it's typical configuration - a.k.a. portrait mode - you know what I'm taking about. My comics scale to your device without giving up image quality and can be enjoyed with just your thumb on the phone.

Also, the HTML content can be read by the crawlers and even translators. Like I mentioned, the words my frogs speak are just normal HTML paragraph tags. The contents of my comics will be picked up by the search engine spiders and make it easier to find my stuff. And a tool like Google Translate can show you the comics in lots of other languages. I'm not sure if the jokes make sense in Swedish, but the words might!

Take My Code, Please


As always, my code is open source and on GitHub. My frogs and jokes aren't, but you probably don't want them anyway.


Amphibian.com comic for August 1, 2014


Sunday, April 27, 2014

Conditional Attributes with Jade

I've been working with Node lately to create a complete web application (not just a Websockets back-end to an HTML5 game) and I am using the Jade template engine with Express.

I really like Express and Jade but the other day I ran into an issue and I just couldn't figure out how to get the HTML output I wanted. The problem was that I wanted to output attributes conditionally. Not just the values of the attributes conditionally, but the whole attribute. Sometimes I wanted to output this:

<img something="whatnot" foo="bar" src="/images/frog.svg" />

and sometimes I wanted to output this

<img something="whatnot" src="/images/frog.svg" />

based on a condition.

It's easy to output attribute values based on conditions. The value for an attribute can actually be any JavaScript expression. So these are all valid in Jade templates:

img(foo='bar')

img(foo=(x == 12 ? 'bar' : 'ribbit'))

img(foo='var-in-the-' + b + '-middle')

I just couldn't figure out how to prevent an attribute from being output at all based on a condition. I finally settled on this:

img(foo=(x == 12 ? 'bar' : ''))

which output this HTML when x is anything but 12:

<img foo="" />

Not really ideal, but I could make it work. I did make it work, but it bothered me. I lost sleep over it. I couldn't eat. I was withdrawn from my family. My children thought that I didn't love them anymore. Okay, maybe I'm exaggerating a little. But seriously, I didn't like it. I didn't want that attribute to come out at all. Today, I found the answer:

img(foo=(x == 12 ? 'bar' : undefined))

Undefined! Of course! Like I said, any valid JavaScript expression can be used. Now when x is anything but 12, the foo attribute is undefined and does not output to the HTML. In case you are curious, null also works in place of undefined. Using undefined is probably better though.

I am sleeping much better now.

Tuesday, December 31, 2013

My GitHub Game-off 2013 Entry

This past November I participated in the GitHub Game-off 2013. Basically it was a month-long game jam where you created a game that could be played in a web browser on the theme of "change." When I first read about it, it was already November 6th so I was a little behind. But since I had some experience with creating HTML5 games using JavaScript and Canvas I thought I'd give it a try.

The theme was "change" which made me immediately think of frogs. In fact, almost everything makes me immediately think of frogs. I decided to make a game about the life-cycle of frogs. Starting as a tadpole, you have to grab food and avoid being eaten by fish. Other tadpoles are also out to get you. It's a hard life for tadpoles. So in my game, you move your tadpole around in a pond trying to catch falling food and grow into a tadpole with legs, a froglet, and finally a full-grown frog. Once you are a frog you leave the pond, but you have to return to complete the cycle. The game completely changes (see, the "change" thing again) when you are a frog and now it's about jumping back in the water and catching bugs.

I drew some tadpoles and fish and plants and stuff, and found some great music from Incompetech and sound effects on Freesound.org. I can't say enough good things about Kevin MacLeod of Incompetech. The library of extremely high-quality music that he offers royalty-free is just awesome. And his graph paper is pretty cool too.


But what about the code? What did I do? How did I throw something together so fast?

For starters, I didn't use any game development systems. I know some that are very popular and allow you to publish your game as HTML5 and for iOS and Android and a whole bunch of other stuff, but I don't know how to use them. I admit it. I'm not a professional game developer. It's more of a hobby. I am a professional software engineer, and I do know how to write decent JavaScript so I just went with what I knew. I also kept it simple. When the game is simple, the code is simple, and doesn't require a lot of overhead from tools. Here's a quick overview of the basics. You can probably use the outline to make some simple HTML5 games yourself.

There are two absolutely essential packages for making HTML5 games: jQuery and SoundManager2. Well, jQuery might be essential for any type of web development these days. But games aren't much fun without sound and SoundManager2 is the library when you want to do sound from JavaScript. Stop what you're doing, download it, learn it, and love it. Right now.

That being said, making a simple game on an HTML5 canvas element is probably easier than you thought. To begin, create a web page with a canvas element.

<!DOCTYPE html>
<html>
  <head>
    <title>Game</title>
    <style>
     canvas { border: 1px solid #000000; } 
    </style>
  </head>
  <body>

    <div>
      <canvas id="game" width="800" height="450"></canvas>
    </div>
    
  </body>
</html>

You're halfway there! Okay, maybe not halfway. The next thing to do is set up some JavaScript to start working with the canvas. The basic outline of any game is to make a loop that updates the objects on the screen and draws them. In modern browsers, we have a nice utility for that - the window.requestAnimationFrame() function. This method has been added specifically for the purposes of doing animations on web pages, and it is the most efficient way of doing so. The following is a bare-bones version of a game. Note that you have to explicitly call requestAnimationFrame again after each call to your run function (or it will only run once!).

(function(window) {
 
 function Game() {
  
  this.lastTime = null;
  this.paused = false;

  this.canvas = null;
  this.ctx = null;
  
  this.setup = function(options) {
   
   this.canvas = options.canvas;
   this.ctx = this.canvas.getContext("2d");

   var me = this;
   window.requestAnimationFrame(function(e) { me.run(e); });

  };
  
  this.run = function(timestamp) {

   var elapsed;
   if (this.lastTime === null) this.lastTime = timestamp;
   elapsed = timestamp - this.lastTime;
   this.lastTime = timestamp;

   this.gameLoop(elapsed)
   
   var me = this;
   window.requestAnimationFrame(function(e) { me.run(e); });
   
  };
  
  this.gameLoop = function(elapsed) {
   
   // update all your objects here
   
   this.gameDraw();

  };
  
  this.gameDraw = function() {

   // clear your canvas   
   this.ctx.clearRect(0,0,this.canvas.width,this.canvas.height);
   
   this.ctx.save();

   // draw all your objects here   
   
   this.ctx.restore();
   
  };

  
 } // Game()
 
 game = new Game();
 
 window.game = game;
 
}(window));

After saving this code (I saved it as "main.js") you can fire it up by adding the following scripts into your HTML file with the canvas element:

<script type="text/javascript" src="js/jquery-1.10.2.min.js"></script>
<script type="text/javascript" src="js/main.js"></script>
<script type="text/javascript">

    $(function() {

        game.setup({
         canvas: document.getElementById("game")
        });
        
    });
      
</script>

Now as soon as your page is loaded, your setup function is called. It is passed the canvas element and starts looping and drawing. To complete your game, just add some objects to be moved around and drawn!

If you'd like to see my completed code, it's here on GitHub: cwleonard / game-off-2013.

If you'd like to play the completed game, you can find it here: The Frog Lifecycle Game.

Leave a comment below with your scores! A really good time for becoming a frog is about 135 seconds.

Saturday, February 23, 2013

Node.js and Socket.io Allow Frogs to Play Together

It can be lonely out there for frogs. They need to interact with other frogs, and not just on Facebook. In the real world. But this isn't the real world, it's a virtual world that is supposed to be sorta like the real world. For frogs. Let's just say that if you want to connect multiple client browsers together to create some sort of online frog collaboration environment, there is no better way than with Node.js and Socket.io.

FFZ is where I play around with browser tech like WebSockets, Canvas, and HTML5 Audio. I like to make things with frogs in them. In this application, you can move a frog around a small world filled with trees, flowers, rocks, and streams. But it's even more fun when another person is on the site at the same time you are - you'll play in a collaborative environment. You will see their frog move in real-time and they'll see yours. It amuses my young children for hours. Just press "R" to ribbit.

How do I hook everybody's browser up together? Well first of all, don't expect it to work with Internet Explorer. Seriously. IE, how can you even show your face in public anymore? Chrome and Firefox work like browsers should. I'm talking WebSockets. Sure, you can do WebSockets the old-fashioned way...but Socket.io is a great utility that abstracts much of the complexity away from you. It's built for Node.js, the awesome server-side Javascript engine. Node allows you to hook up tons of clients together with very little overhead because of its event-driven IO model.

My FFZ "server" is a Node.js program that listens for events from the client browsers running the application and publishes events out to the clients as well. When one frog moves, it publishes its changed position to the server, which turns around the publishes it to all the other browsers so they can update the positions of that frog on their screens. And thanks to Socket.io, it's extremely simple.

Here's my Node server code:


var http = require("http");
var sockio = require("socket.io");

var frogs = [];

var io = sockio.listen(8080);
io.configure(function() {
    io.set('log level', 2);
    io.set('transports', [
      'websocket'
    ]);
});

io.sockets.on("connection", function(socket) {
      
    socket.on("frogmove", function(fdata) {
        socket.broadcast.emit("fm", fdata);
    });

    socket.on("objmove", function(odata) {
        socket.broadcast.emit('sm', odata);
    });
      
    socket.on("ribbit", function(fdata) {
        socket.broadcast.emit("rbbt", fdata);
    });
      
    socket.on("startup", function(msg) {
        console.log("frog " + msg.fid + " connected");
        socket.broadcast.emit("newfrog", msg.fid);
 socket.set("frog id", msg.fid);
 frogs.forEach(function(i) {
            socket.emit("newfrog", i);
 });
 frogs.push(msg.fid);
    });
      
    socket.on("disconnect", function() {
        socket.get("frog id", function(err, fid) {
            console.log("frog " + fid + " disconnected");
     socket.broadcast.emit("byefrog", fid);
         if (frogs.indexOf(fid) != -1) {
                frogs.splice(frogs.indexOf(fid), 1);
            }
 });
    });

});


So hopefully the first part of the code is fairly self-explanatory. In the configuration of the socket listener, I set the "transports" to be just "websocket" because I don't want it to automatically downgrade to Flash or long-polling. Those things are fine I suppose but I wanted to use FFZ to try out WebSockets. (I actually did try Flash and long-polling with FFZ. Flash is ok but long-polling just doesn't work with an application like this - there was just too much data being transmitted and the user experience was poor.)

The second block is where the real magic happens. On a "connection" event, we set up the event listeners for that socket. The first three events are very simple. When a socket, which represents a connection to a client, gets a "frogmove" event, for example, it just turns around and broadcasts it out again. The "broadcast" method sends a message to all known sockets except oneself - so the sender isn't going to get the message back but every other socket that Socket.io knows about will get it. This is how I handle the simple events - moving frogs and objects and making frogs ribbit.

The "startup" event gets a little more complicated. When a new client connects, they need to let all the other clients know to add them to their screens, but the new client also needs to know where all the existing frogs are so they can be added to their screen. So here I use the "socket.broadcast.emit" method again to tell everyone else about the new frog - and then I use "socket.emit" to send a "newfrog" event back to the socket that just joined. This is a bit of a trick because these aren't exactly new frogs (they existed before the new client joined) but the client will behave the same way as if a new frog joined - by adding the other frog(s) to the screen and tracking them for future updates. Finally, I add the new client id to the frogs array so the server knows about this frog in the future, at least until it disconnects.

That brings me to the "disconnect" event. Again, I use the broadcast to tell everyone else to stop displaying and tracking the frog that just left. I also then remove it from the frogs array.

So there you have it. A server in Node.js that keeps all the frogs playing nicely together. Easy peasy lemon squeezy. Now let's take a gander at the client code too. It's almost as simple.

The first thing to do in the client is to load the Socket.io code. But it serves itself! That's right, when Socket.io wants a sandwich it makes it and brings it to itself. You just source the JavaScript right from your Node.js server. So for example, if you look at the server code above you will notice that I'm running on port 8080 and I serve everything from amphibian.com. So I have this in my HTML:

<script type="text/javascript" src="http://www.amphibian.com:8080/socket.io/socket.io.js"></script>

Bam! You've got the Socket.io client now! By the way, you can actually serve the client manually if you need to for some obscure reason. See https://github.com/LearnBoost/socket.io-client

This is what I do to get the socket connected and set up the client's frog to publish events:


<script type="text/javascript">

sckt = io.connect("http://www.amphibian.com:8080");

sckt.on("connect", function() {

    console.log("socket connected");
    frog.bind('move', function(fdata) {
        // fdata will have the frog's id and position info
        sckt.emit("frogmove", fdata);
    });

    frog.bind('ribbit', function(fdata) {
        // fdata will have the frog's id and position info
        sckt.emit("ribbit", fdata);
    });

});

</script>


The "connect" call is fairly simple, you just give it the URL. Then you get up your connect event callback. When the "connect" event occurs, I bind some events on the client's frog to functions which will emit data over the socket. (I use MicroEvent.js to do this. You can read more about that here. It is awesome.) This works pretty much the same way as on the server side. Calling "emit" with an event name and some data sends that event+data to the server where (hopefully) there is a callback set up listening for that event. So in the code above, I emit the "frogmove" event and the "ribbit" event, both of which are listened for in the server code shown previously.

Remember that the server essentially rebroadcasts events from one client to all the other clients using custom event names. I'll just show you one here, the "rbbt" event, but the others are all very similar.


<script type="text/javascript">

sckt.on("rbbt", function(fdata) {
    for (var f = 0; f < otherfrogs.length; f++) {
        if (otherfrogs[f].uid == fdata.id) {
            otherfrogs[f].ribbit();
        }
    }
});

</script>

If you look at the server code and the first part of the client setup, you'll see that when a client's frog ribbits the event is published over the socket as the "ribbit" event. The server gets that and republishes to all other clients as a "rbbt" event. I removed the vowels. Servers don't like to broadcast vowels. No, that statement is completely false. Really I just wanted a slightly different event name so I could tell the client and server events apart. Anyway, this is an example of the client listening for the "rbbt" custom event. If this client gets such an event it means that some other client's frog is making a sound and so we should show that frog opening his mouth and play the sound as well. The data that comes in will have the other frog's id in it so we just look for which frog it should be and then call the "ribbit" method on that frog.

Couldn't be easier, right?

And there's even better news! What if you wanted to hook up your OUYA game to a Node.js server using Socket.io? I know I do! There is a Java client available for Socket.io that works on Android. So technically you could hook up web browsers, mobile phones, game consoles, and possibly even refrigerators all to the same server to share data in real-time. Yes, Node.js most assuredly rocks.


Wednesday, July 6, 2011

Your Polygons are Hitting Each Other

While working on HTML5 games, I sometimes need something in JavaScript that I'm not able to find. On one such occasion I found myself in need of a JavaScript polygon object that would support collision detection with other polygons. This algorithm, using the Separating Axis Theorem, is well-known and had many implementations in other languages. It wasn't too difficult to convert it to JavaScript. While I was at it, I added methods to support determining if the polygon contains a given point (to detect if I was clicking on it) and rotating the polygon.

You can see what I came up with here, and I have a test page for it here.

As you can see by viewing the source of the test page, it is fairly easy to use. It is designed to combine with the HTML5 canvas element.

To create a polygon centered at a given point and using center-relative coordinates for the vertices, you do something like this:
var poly = new Polygon( { x: 50, y: 50 }, "#00FF00");
poly.addPoint( { x: -20, y: -20 } );
poly.addPoint( { x: -20, y: 20 } );
poly.addPoint( { x: 20, y: 20 } );
If you want to use all absolute coordinates for the vertices, you can do that too:
var poly = new Polygon( { x: 50, y: 50 }, "#00FF00");
poly.addAbsolutePoint( { x: 130, y: 130 } );
poly.addAbsolutePoint( { x: 130, y: 170 } );
poly.addAbsolutePoint( { x: 170, y: 170 } );
To rotate, just call the rotate method with the number of radians you want to rotate. Remember, to convert degrees to radians, multiply by Pi/180.
poly.rotate(0.78539); // 45 degrees
So now you have no excuse for not making a fun HTML5 canvas game. I'd like to see a game about cheese-making. I think that would be awesome.

Saturday, April 16, 2011

Building by the Byte - the HTML5 File API

One of the major features needed in JavaScript to make it truly useful as an application language is file processing. I'm talking about handling the contents of a file totally in your web browser. No server needed. Even non-text format files. Now with HTML5 we have this capability in the File API! I've been thinking about the awesome new possibilities opened up by this development, and put together an example of what it can be used for.

First, let's talk about the browser support. The latest Chrome, Safari, and Firefox browsers support the new JavaScript File API. Internet Explorer? Nope. Get a real browser.

The first thing to understand is the FileReader object. It's a new built-in object, sort of like the XMLHttpRequest object. Like the familiar XHR, FileReader is designed to work asynchronously. That means you'll need to specify your own onload function to the object, which will be called when the browser is done with the file. Think about it - it could take a while to process a file and you don't necessarily need your app tied up waiting for it. Look at this simple example...
var reader = new FileReader();
reader.onload = function(event) {
// file is loaded, contents are in event.target.result
// do something with it!
}
reader.readAsBinaryString(file);
Now you're probably asking a few questions at this point. Where did you get the file object? How does JavaScript handle binary data? What if there's an error? How do they get the peanut butter inside the peanut butter cups? I can answer all but that last one.

First, there are a few ways to get a file object. My favorite is to grab one simply by dragging it into the browser window. This is accomplished via the dataTransfer property of the event object. For example, let's say you have the following div in your page...

<div id="drophere" style="text-align: center; width: 200px; height: 100px;">drop a file here</div>
And then you had some JavaScript like this...
document.getElementById('drophere').ondrop = function (evt) {
evt.preventDefault();
var file = evt.dataTransfer.files[0];
// now you've got a file object, which is the file you dropped
return false; // don't let the browser navigate away
}
Now just drag a file into your browser window and drop it on your div. Awesome! You've got a file. Now just combine this function with the previous one and you're all set to process anything you can drag in. Well, almost. There's still that binary data issue. JavaScript doesn't really have a data structure designed for binary data.

This is where you break out the FileReader and pass in that file object. Add the code from the first example into the second example....

function handleDrop(evt) {
evt.preventDefault();
var file = evt.dataTransfer.files[0];
var reader = new FileReader();
reader.onload = function(event) {
// file is loaded, contents are in event.target.result
// do something with it!
}
reader.readAsBinaryString(file);
return false; // don't let the browser navigate away
}
So when you get the event.target.result object (in the reader's onload function), what will it be? It's actually going to be a String where each character code is between 0 and 255. To read the "bytes" of the file, just loop through all the characters calling charCodeAt on each one. I made an object to help with all the functions you might want to do with the "byte array"...

function DataReader(a) {
 
 this.bytes = a;
 this.index = 0;
 this.byteRead = 0;
 this.bitIndex = 0;
 this.endian = "big";
 
}

DataReader.prototype.readByte = function() {
 if (this.eof()) return;
 var ret = this.bytes.charCodeAt(this.index);
 this.index++;
 return ret;
}

DataReader.prototype.readBytes = function(howMany) {
 if (this.eof()) return;
 var ret = new Array();
 for (var i = 0; i < howMany; i++) {
  ret.push(this.readByte());
 }
 return ret;
}


DataReader.prototype.readInteger = function(numBytes) {
 
 if (this.eof()) return;
 
 var howMany = 4; // default to a 4-byte integer
 if (numBytes) {
  howMany = numBytes;
 }
 
 var ret = 0;
 if (this.endian == "little") {
  var origIndex = this.index;
  for (var n = this.index + howMany - 1; n >= origIndex; n--) {
   ret = ((ret << 8) | this.bytes.charCodeAt(n));
   this.index++;
  }
 } else {
  for (var n = 0; n < howMany; n++) {
   ret = ((ret << 8) | this.bytes.charCodeAt(this.index));
   this.index++;
  }
 }
 return ret;
 
}

DataReader.prototype.readString = function(len) {
 if (!len || this.eof()) return;
 var ret = this.bytes.substring(this.index, this.index + len);
 this.index += len;
 return ret;
}

DataReader.prototype.readNullTerminatedString = function() {
 if (this.eof()) return;
 var slen = 0;
 var n = this.index;
 var finished = false;
 while (!finished && n <= this.bytes.length) {
  var c = this.bytes.charCodeAt(n);
  if (c == 0) {
   finished = true;
  }
  slen++;
  n++;
 }
 var ret = this.bytes.substring(this.index, this.index + (slen - 1));
 this.index += slen;
 return ret;
 
}

DataReader.prototype.skip = function(num) {
 if (this.eof()) return;
 this.index += num;
}

DataReader.prototype.eof = function() {
 return (this.index >= this.bytes.length - 1);
}

I should mention that there are other options for processing the file. If you used readAsText instead of readAsBinaryString, you'd just get a normal string containing the contents of the file. That's only really useful if you know the file will only contain text data. A third option is readAsDataURL, which returns a data: URL instead of a string. You can use this to directly set the src attribute of an img tag with the dropped file. Again, this will have limited usefulness. Getting the binary string is the most powerful.

This is a good time to talk about the onerror function. If you tried the above example in Chrome using a local HTML file, it won't work. You'll get an error. You'll only know that if you specify an onerror function as well as an onload. Don't expect a whole lot of details in the error, however.
reader.onerror = function (event) {
console.log(this.error.code);
}
You'll see a "4" in the console. That's helpful... It actually means that Chrome, by default, does not allow local files (your test HTML file) access other local files (the file you drop in). Firefox does. It's not a real big deal, you can either test using a local server instead of just loading the file or add the "--allow-file-access-from-files" flag to Chrome when you start it. Security thing.

Okay, okay, okay...now what can you build with this? Well, some really amazing things. I put together this nifty example that will read PNG files and display them in the browser not as images, but as a bunch of DIVs (one for each pixel). To accomplish this, I just needed two things. One, the PNG specification which can be found here. And two, a way to inflate compressed data blocks inside the files. For that part, I used my pure JavaScript Inflater that I talked about in my last post.


If you don't have your own PNG file handy, use this one: http://www.amphibian.com/blogstuff/small_dr_frog.png

Make sure you check out the page source to see how it all works. It turns out that PNG files are fairly easy to work with once you have the data inflated.

I know my example is not particularly practical, but I hope it can at least inspire you to make something of your own that uses these splendid new HTML5 features. Use your imagination and let me know what you come up with!

Saturday, January 1, 2011

Inflate in JavaScript

Here's a little something I've been working with for the last few weeks...the Inflate algorithm implemented in JavaScript.

Just what is Inflate? Well, it's the opposite of Deflate. Obviously. In addition, it's also the algorithm used by gzip, WinZip, zlib, etc. to uncompress data. You can read all about it here or read the full RFC. It's been around a long time and has been implemented in lots of different languages, but I really wanted a pure JavaScript version. I'm that crazy.

I needed this because I've been working with the new HTML5 File API. With it, you can process file data in the client browser before uploading it to the server. This is great, until you try to work with a type of file (PNG, for example) that uses the Deflate algorithm to compress its data. I basically converted the simplest possible implementation of the process, Mark Adler's puff.c, to JavaScript and it works pretty well.

I'll have more to say on the HTML5 File API later, but now I release the JavaScript Inflate to the world! Typically, the algorithm works by processing streams of bytes. JavaScript, however, does not have such a data structure. Instead we just use arrays of numbers between 0 and 255 as input and output.

And a word of caution, I wouldn't try running this on a 3-years-out-of-date web browser or some old version of Netscape Navigator you've got running somewhere. It works great in the latest version of Chrome.


UPDATE! Here's a link to a page that you can use to see this thing in action. It uses a little HTML5 File API, which I'll discuss in a later post. I didn't explain much how to use the inflater in my original post so I hope this helps. It is really simple. Once you have your array of "bytes" representing deflated data, just pass it to the puff function along with an empty array you want to get filled up with the inflated "bytes". It will look like this:
var deflated = new Array();
// fill deflated with "bytes"
var inflated = new Array();
puff(inflated, deflated);
Your inflated array will contain the inflated data. It's that easy.